Guide · about 5 min read
Your first part for a 3D printer: a keychain in 5 minutes
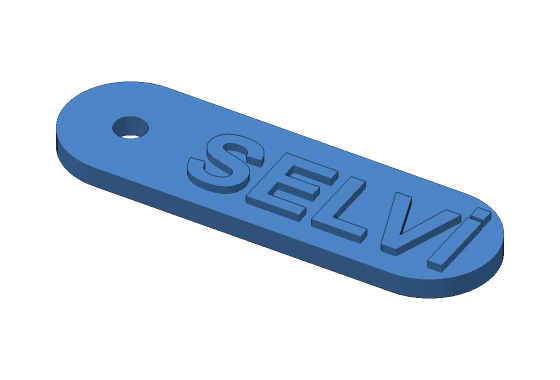
You have a 3D printer but do not know how to model? A keychain is a good first part: it is small, prints quickly and carries your name. SelviCAD has a ready keychain template: you type your name, choose a few sizes, and the part is done. Then the print check shows you the orientation and print time, and you send it to your slicer.
About the language: SelviCAD's interface is in Turkish today; an English UI is coming soon. Menu and button names are written in Turkish as they appear on screen, with the English meaning in brackets.
What do you need?
- SelviCAD on Windows 10 or 11. You can request a trial key with the form on the home page.
- A 3D printer and a slicer (such as Bambu Studio, OrcaSlicer, PrusaSlicer or UltiMaker Cura; whichever your printer's maker recommends).
- Some filament and a keyring. No modelling experience needed.
“5 minutes” is the time from opening the program to sending the part to the slicer. The print itself depends on your printer and settings.
Step by step
Open the template gallery
Open SelviCAD. In the welcome window on first launch, choose “Bir şablondan başla” (start from a template); or use Dosya → Şablondan yeni… (the Hazır Şablonlar button on the Kütüphane tab opens the same gallery).
Choose the keychain card
Click Anahtarlık (Keychain) among the picture cards. Type your name in the form on the right; the preview updates as you type. The plate stretches to fit the text, and the ring hole is ready.
Change the sizes if you like
The starting values suit most uses; see the table below if you want to adjust them.
Press Oluştur
Press Oluştur (Create) and the part is yours. The sizes stay in the Parametreler (Parameters) list: you can change the thickness or the letter height there later, and the part updates.
Turn the part and look at it
Hold the mouse wheel and drag to rotate. Ctrl + 7 gives the isometric view, Ctrl + 5 the top view, and F zooms to fit.
Open 3B Baskı Denetimi
On the Hesapla (Evaluate) tab, press 3B Baskı Denetimi (3D Print Check). Overhanging faces (that need support) turn red, and the face touching the print bed turns blue.
Read the result
In the panel you choose the up direction, the filament (PLA, PETG, ABS, ASA, TPU, nylon) and the infill; you see the overhang area, support volume, bed contact, height and layer count, plus estimated grams and time. If the program finds a better orientation, a “Önerilen yöne geç” (switch to the suggested orientation) button appears.
Save and send to the slicer
Save with Ctrl + S. Then Dosya → 3B yazıcıya gönder (dilimleyici) (File → Send to 3D printer, slicer): the part is saved as 3MF and opens in the slicer installed on your computer. The “Dilimleyiciye bu yönde gönder” (send to the slicer in this orientation) button in the check panel does the same and keeps the orientation you chose.
Keychain sizes
| Field | Start | Range |
|---|---|---|
| Yazı (your name)The plate stretches to fit the text | SELVİ | 1–14 letters |
| Harf boyu (letter size)Height of the capital letters | 10 mm | 5–25 mm |
| Plaka kalınlığı (plate thickness)Thickness of the keychain | 3 mm | 1.5–8 mm |
| Harflerin yüksekliği (letter height)How far the letters stand out of the plate | 1.2 mm | 0.4–4 mm |
| Yazı çevresindeki boşluk (margin)Between the letters and the plate edge | 3 mm | 1.5–10 mm |
| Halka deliği çapı (ring hole diameter)The hole the keyring goes through | 4.5 mm | 3–8 mm |
Names with Turkish letters work. If there is a capital letter with a dot or accent, the plate gets a little taller so the dot does not run off the plate. The name cannot be empty and cannot be longer than 14 letters.
What does the print check say?
With the plate lying flat and the letters on top, there is usually no overhanging face; look at the “Sarkma (destek)” (overhang, support) row in the panel. The orientation that puts the flat face on the print bed is usually the best; if you choose another one, the check shows the support volume it needs. The estimated grams and time change when you choose your filament and infill.
The estimates assume a 0.4 mm nozzle, 2 walls and 0.2 mm layers; the slicer gives the exact values.
If you changed the sizes, also run Tasarım Denetimi (Design Check) on the Hesapla tab before printing: it collects things like thin walls that cause trouble in printing.
Sending to the slicer
Dosya → 3B yazıcıya gönder (dilimleyici) looks for the slicers installed on your computer (Bambu Studio, OrcaSlicer, PrusaSlicer, UltiMaker Cura, Creality Print and similar) and opens the part in one of them. If none is found, it opens the 3MF file in Windows' default app.
To do it by hand, choose 3MF or STL in Dosya → Dışa aktar (File → Export); STL is the most common, and most slicers open both. In the slicer, choose your filament and layer height. For a keychain this size, 0.2 mm layers and 15–20% infill are a common start; it depends on your printer and filament.
Small problems, small fixes
- The letters come out thin or faint. Increase the letter size, or raise the letter height above 1.2 mm.
- The ring does not fit. Increase the ring hole diameter (8 mm at most).
- The name is long. Up to 14 letters fit; shorten it or use the initial of your surname.
- Someone else wants one too. Create it again from the template with another name; each one becomes a separate part.
Next step: your own part
The keychain is just one of the templates in the gallery. The same gallery has a shelf bracket, a box with lid, a hinge, a spur gear, a phone stand, a pen holder, a wall hook, a sheet metal L bracket and a box + lid assembly; in each you type a few sizes. To model from scratch, the “İlk parçam” (My first part) and “3B baskı için hazırlama” (preparing for 3D printing) lessons under Yardım → Eğitim (Help → Tutorial) mark the button to press at each step on screen.
You can also model your own keychain: in Eskiz (Sketch) draw a rectangle and a circle, dimension them, and type your name with the Metin (Text) tool; the letters become a profile that you raise with Ekstrüzyon (Extrude) or engrave with Kesme (Cut). The logic is the same: sketch, dimension, extrude.
Frequently asked questions
I have never modelled in 3D. Can I do this?
Yes. In the template you only type your name and choose a few sizes. If you want to learn modelling, the “İlk parçam” (My first part) tutorial walks you through a part in seven steps.
Should I use STL or 3MF?
Both are in Dosya → Dışa aktar (File → Export). STL is the most common, and 3MF opens in most slicers too. The “3B yazıcıya gönder” command uses 3MF.
I do not have a slicer. What should I do?
Install the slicer your printer's maker recommends. SelviCAD prepares the part and sends it to the slicer; the slicer does the slicing.
Do I need the internet while modelling?
Not for modelling, the print check or exporting. The license needs a short connection at first sign-in, then at least once every 14 days.
Where is my part stored?
On your own computer, in the Documents\SelviCAD folder. The program does not upload your parts anywhere.
Print your keychain.
Try it free for 30 days with every feature included. Fill in the form for a trial key and a personal download link.